🧪 I’ve been exploring how ads work and experimenting with them on this site (non-profit, just hands-on learning). Let me know if it affects your user experience here.
I share real-world lessons from building scalable systems at Jump Trading, Binance, and running mission-critical cloud ops at GovTech and Singapore Air Force. No fluff, just practical takeaways, hard-earned fixes, and deep dives that matter.
Connection between the user from the public network and itself is encrypted
Connection between the Secure Tunneling Client and itself is encrypted
So in order for it to know where to forward the data to, it needs to decrypt and de-encapsulate the encrypted data it receives. It forwards to user if the encrypted data is from secure tunneling client, vice versa.
Protected Data Transmission
The traffic in transit from users in the public network to the service running on local machine is fully encrypted
Pre-shared Keys: Client and server both have the same secret key (Used by Ngrok in the form of API key, and Cloudflare Tunnel in the form of TunnelSecret)
Digital Certificates: The server provides a digital certificate to prove identity, and the client may do the same
Username/Password: Less secure, but sometimes used in simple setups.
Firewall Bypass
Enable service running on local machine to be exposed to the public network without opening any ports on the local machine or the firewall of the local network
Caution
Make sure the endpoint of the secure tunneling server isn’t blocked by the firewall
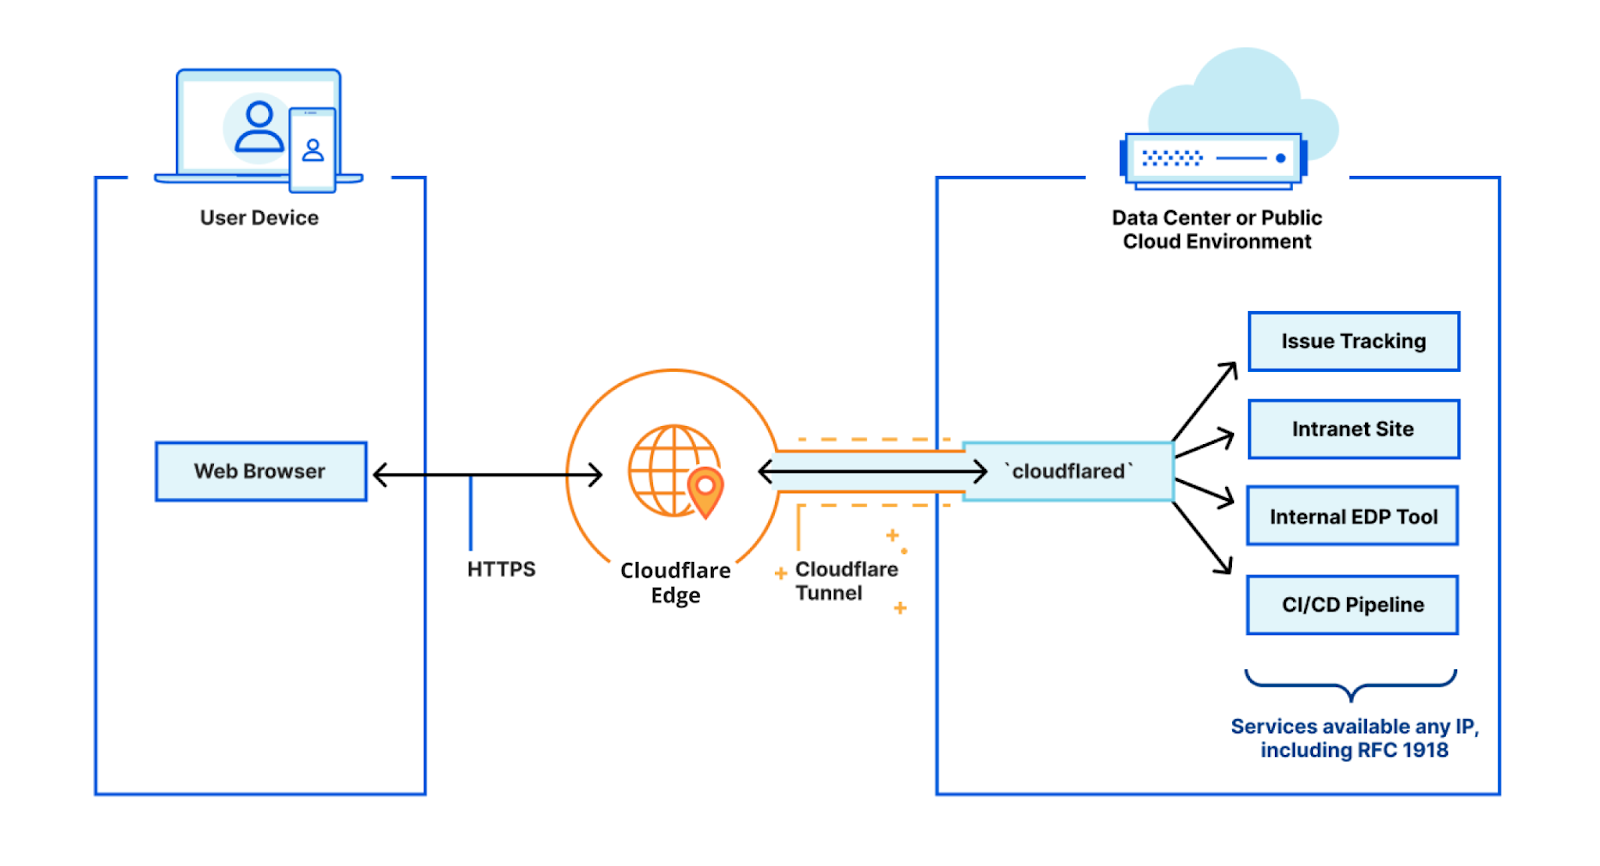
Secure Tunneling Architecture
The above diagram is showing Cloudflare Tunnel, but the architecture is the pretty much the same for other Secure Tunnel implementations
Secure Tunneling Server: Cloudflare Edge Server running inside the Cloudflare’s Network (the yellow box shown above)
Secure Tunneling ClientCloudflared running along side the service that runs inside your local machine (the blue box shown above)
This is for quick testing without a Cloudflare account, but it comes with minimal control. No custom domain, no authentication, limited bandwidth and unstable etc. Refer to Cloudflare Quick Tunnel for more details
Secure Tunneling of a local port
cloudflared tunnel --url 127.0.0.1:<PORT_NUMBER>
Restrict access to Cloudflare Tunnel endpoint with Cloudflare Access
By default, Cloudflare Tunnel is accesible by anyone from the Internet via the public Domain Name. We can make use of Cloudflare Access to ensure only authenticated users can access the Cloudflare Tunnel
Create a remotely-managed tunnel
This requires us to have a Cloudflare account and the creation of the Cloudflare Tunnel is done inside the Cloudflare website. Refer to Create a remotely-managed tunnel (dashboard) for more details
Create a locally-managed Cloudflare Tunnel with cloudflared CLI
Use sudo cloudflared service install <TOKEN> to register the connector as a service managed by Init System. You can only have one Cloudflare Tunnel Service on one machine at any time!
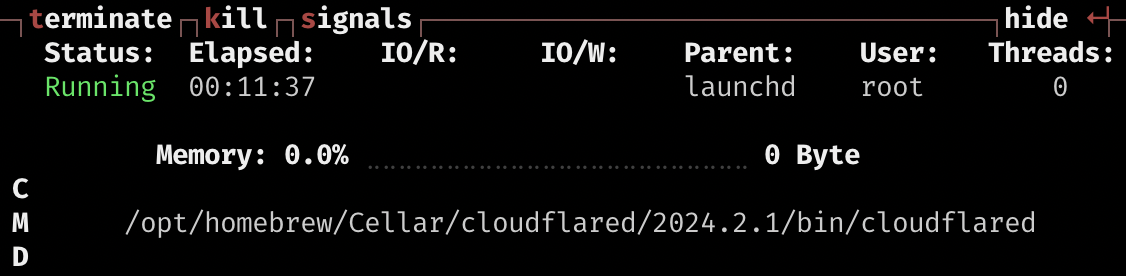
Cloudflare Tunnel Init System Service on Mac
When you run sudo cloudflared service install <TOKEN>, a service file should be created at the following path /Library/LaunchDaemons/com.cloudflare.cloudflared.plist.
You can remove the Cloudflare Tunnel Service by running sudo cloudflared service uninstall <TOKEN>.
The Cloudflare Tunnel Service’s parent is launchd.
Cloudflare Tunnel Init System Service on Linux
You can check the status of service the using sudo systemctl status cloudflared.
Docker
Run the connector as a docker container without the need to grant root access but we have to manually manage the lifecycle of the connector
Connector Installation Issue with Docker
For some reasons, when I close the terminal, the connector container will auto exit. Even thought I used both -d and --restart unless-stopped. I am running Docker on my Raspberry Pi. If you know why, please comment down below to tell me why. Thanks :)
Terraforming Cloudflare Tunnel
When you use the Cloudflare tunnel Terraform resource block to create a Cloudflare Tunnel, it creates a locally-managed tunnel. The way to terraform a remotely-managed tunnel is to first create the tunnel and terraform import the terraform.